Fraud Blocker Trenchless Pipe Lining Installation - Trenchless Pipe Lining South Florida

Call Us Today

(305) 946-9626

The 2 most common methods used for trenchless pipe lining installation

Cured-in-place pipe (CIPP) lining and epoxy pipe lining installation explained in detail

There are essentially 3 steps to pipe lining installation:

  1. Clean the rust and scale out of the pipes
  2. Install the epoxy on the surface of the pipe. The 2 main methods:
    1. Using Cured-In-Place Pipe (CIPP) lining (old, riskier method)
    2. Epoxy pipe lining
  3. Make final video recordings

1. Remove The Rust and Scale From The Pipe Wall

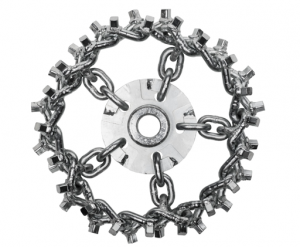
First, the old scale and rust have to be removed using patented tools designed to remove rock-hard scale and rust, without breaking up the old remaining pipe.
This carbide chain has very sharp edges and it fits on a special cable that rotates at 600 RMP inside the pipe. The chains come in specific sizes that can only expand to the width of the internal diameter of the pipe being cleaned, which prevents any excessive outward pressure on the pipe wall.
Next, this tool is attached to the rotating cable. It has 4 “sandpaper flaps” that sand down the remaining pipe to make it smooth.

Wash The Debris Out Of The Pipe

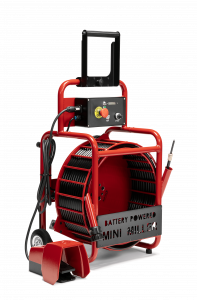
Next, a high-pressure water “jetter” is inserted into the pipe which washes out all the debris. At the end of the cleaning process, all roots, rust, and scale have been removed, and cracks and holes are clearly visible in the next step.

Video Inspect The Pipe

Next, a video camera is run through the pipe to see how long the pipe is and whether it has been cleaned sufficiently. The cleaning process might have to be repeated. Also, if there are very large holes and voids at the bottom of the pipe, they will be filled with epoxy under camera supervision, prior to pipe lining.

2. Pipe Lining Installation

Option 1: Epoxy Pipe Lining

  • Use high-pressure air flow to dry the pipes
  • Prepare the epoxy mixer, pump, hoses, and delivery nozzle
  • Push the delivery nozzle and video inspection camera to the furthest end of the pipe
  • Turn on the mixer and pump, and start rotating the nozzle
  • Pull back the camera and delivery nozzle slowly under camera supervision to ensure that a uniform layer of epoxy is applied to the inside of the pipe
  • Allow the epoxy to harden (1hr-4hrs), and install a second layer of epoxy pipe lining if required

Video Of Epoxy PIpe Lining Installation

Option 2: Cured-In-Place Pipe (CIPP) Lining

  • Descale and clean the pipes
  • Saturate a fabric tube (sock) containing a “balloon” with the epoxy resin
  • Using a rope/cable, pull the sock and containing the balloon into the pipe
  • Inflate the balloon to push the sock against the wall of the pipe
  • Wait 3-4 hours for the epoxy to harden, then remove the balloon